Yesterday I had an inset day (a day off school due to teacher training) which gave me a little more time to focus on myself and hobbies, in contrast to the usual coursework-doing. Thank god for that. I decided I'll do something productive. Before in the week, I bought a gorgeous vintagey floral skirt in Primark for a pound, unfortunately it was 3 sizes too big but I bought it anyway - might come in handy one day. Infact on the day of my purchase I was on a hunt for one of those flowy crop tops. I looked everywhere for a fairly cheap one but that was all in vain; the cheapest I found was 25 pounds. -___- Understandable if it had any sort of applique or at least a colourful pattern but we're talking plain, one coloured short vest here (in other words). I looked at my over sized skirt and zwoooshhh! An idea popped in my head; I though, why pay for one of those when you can just simply make one using an over sized skirt which is most likely to sit in my cupboard in shadow and loneliness? Well, Find out how I went from this:

TO THIS:
Well, This is how:
I used a 95% polyester and 5% elastane skirt , (3 sizes too big, which was really helpful in this case) and firstly I cut off the waist band because we don't need it, so off it goes, au revoir waistband.
Then, I turned it facing wrong side up and folded in half as you can see
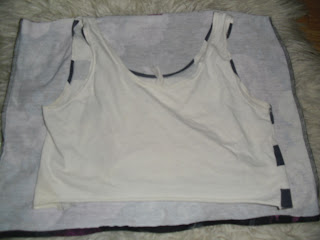
secondly, I got an already purchased crop top and used it as an template
I drew around the top of it because I didn't want the crop top to be in exactly the same shape and size as the already purchased one, so I left the bottom as it is, and because the skirt is quite large and the material is soft and adaptable stays more flowey. Plus the bottom edges of the skirt are already sewn over to stop if from fraying, so leaving it as it is saves me a while of sewing :)
I folded it in half so that when you cut both sides, they will both be fairly even. Then I cut along the drawn lines
Turn it over to the other side and TaDa. BUT! that's not all. Remember althought it looks complete, you still have to sew the straps together, although Next step is
sewing over the edges, this way it'll make the top look a bit less scruffy as well as stopping it from fraying
I folded the fabric over about a centimetre all around the very top half, where I cut it and where it's most likely to fray, and then pinned it to keep it in place when sewing
I sewn round all the edges where I have pinned on a straight (normal) stitch.
I kept the pins in when sewing which saved me from tacking but once the pins have been stitched over, they end up a little bent :/
Voila! The edges are over and done with and now all that's left to do is
sewing the strapy-bits together, and nothing could be easier than that
I got the two out of four pieces of strappy bits and vaguely measured out how long the straps I want to be. What's left to do is sew them together on the wrong side,( the image above shows you what it would look like on the right side, so don't get confused by that)
Then I just sew over the two pieces together (horizontally) using the straight stitch
and did the same for the other two pieces left for the straps. Make sure the straps are parallel to each other, you wouldn't want to end up cross-strapped :)
Finished.
that literally took me 50 min, I hope you try it out sometime, so my mini tutorial doesn't go in vain :)


